
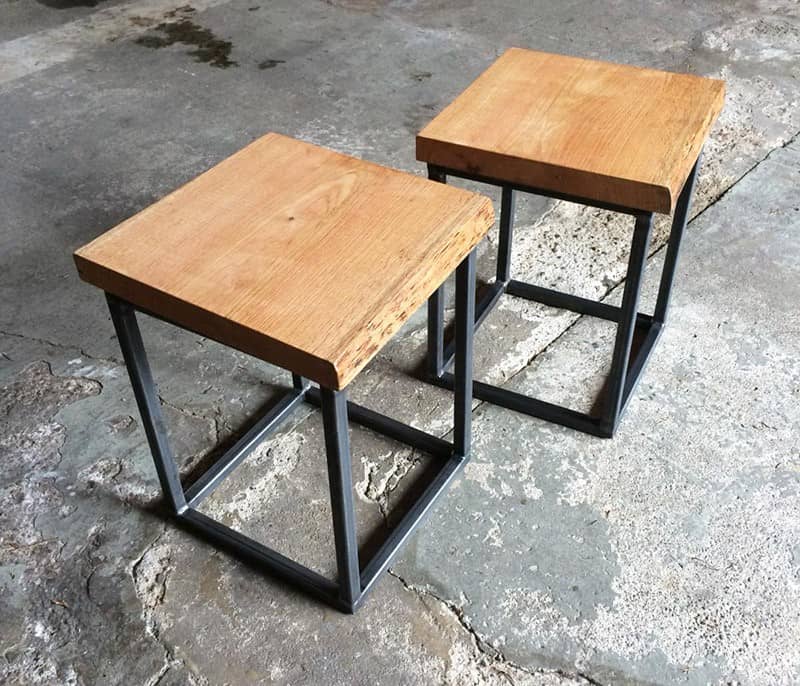
Can you get a Build bedside table yourself – aus alten Holzbohlen? Kein Problem! Ich habe sogar gleich zwei Nachttische für unsere Wohnung aus 35 Jahre alten Eichenbohlen upgecycelt – ganz im Sinne des Zero Waste Lifestyle. In the end it became two bedside tables with real industrial charm.
Wie ich vorgegangen bin, als ich mir die Nachttische selber gebaut habe, erfährst du jetzt in diesem Artikel im DIY furniture blog.
Here is another short Table of contents for you:
Plan für's Nachttisch selber bauen
Wenn du dir einen Nachttisch selber bauen willst, solltest du dir im Vorfeld einen klaren Plan überlegen. Das ist auch grundsätzlich eine gute Regel, für alles was du dir so vornimmst im Leben. Im Falle der DIY Nachttische solltest du dir deshalb die Fragen zum Stil, der Größe sowie des Materials beantworten.
DIY bedside tables style
Ich bin ein großer Fan des Industrial designs, weil jedes Möbelstück automatisch einzigartig wirkt und es das in der Regel auch ist. Es muss nicht alles glatt, gerade und parallel zueinander verlaufen. Und nagelneu muss das Material schon gar nicht sein. Im Industrial Design legt man stattdessen großen Wert darauf, dass gebrauchte Gegenstände aus der Industrie verwendet werden. Das ich in diesem Stil auch unseren Dining table self made habe, hat die Entscheidung zusätzlich erleichtert.
Größe & Höhe des selbst gebauten Nachttisches
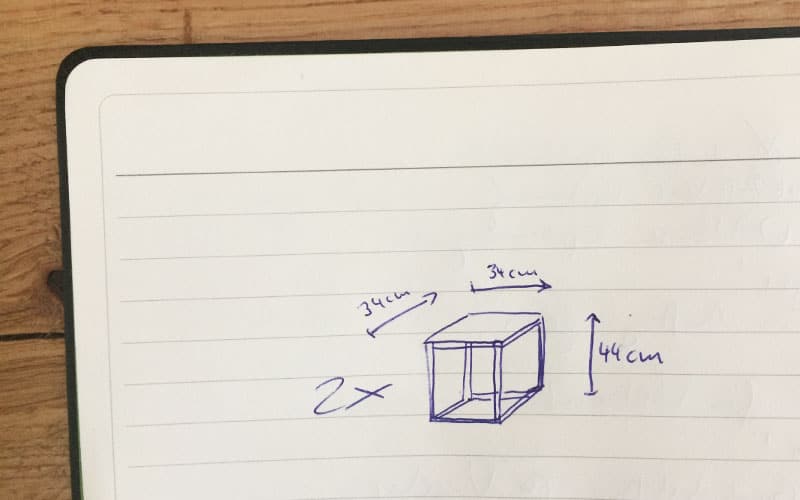
Überlege dir im nächsten Schritt genau, welche Maße der Nachttisch haben soll. Dazu musst du auch wissen, wo der oder die Nachttische nachher stehen sollen und wie viel Platz dort zur Verfügung steht. In unserem Fall habe ich mich für eine Oberfläche von 34×34 cm entschieden, weil das locker ausreicht. Die Höhe ist besonders wichtig – je nach Betthöhe solltest du einfach einmal anhalten, wie hoch der Nachttisch mindestens sein muss. Bei unserem DIY Nachttisch habe ich mich für eine Höhe von 44 cm inklusive Oberfläche entschieden.
Material of the self-made bedside tables
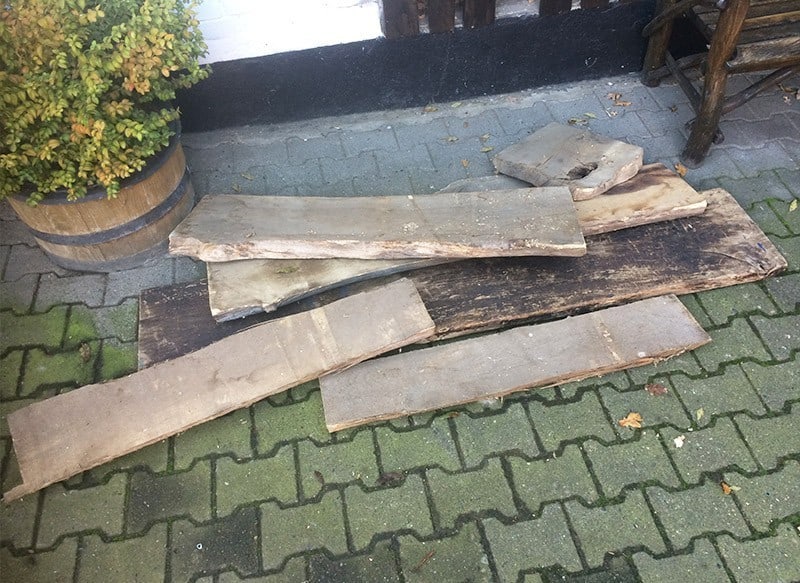
Auf dem Dorf findet sich in der Regel eine größere Auswahl an geeignetem Material – aber auch in der Großstadt ist grundsätzlich alles möglich. Von einem bekannten habe ich alte Oak planks bekommen, die bis dato 35 Jahre lang gestapelt auf einem Bauernhof lagen. Ich empfehle dir, einfach ein bisschen in deinem Bekanntenkreis herumzufragen. Die Kufen des Tisches sollten aus Metall sein, um einen schönen Gegensatz zum Holz zu schaffen und ausreichend Stabilität zu gewährleisten.
DIY nightstand build yourself
Nun geht es ans Eingemachte: die Durchführung! Glücklicherweise ist das beim selbst gebauten Nachttisch gar nicht so kompliziert, da die Oberflächen schön klein und leicht zu transportieren sind und auch das Streichen nicht viel Zeit in Anspruch nimmt.
Ich möchte dir jetzt beschreiben, wie ich vorgegangen bin.
1) Clean wooden planks
Wenn Eichenbohlen 35 Jahre in einer staubigen, dunklen Ecke dahin-vegetieren, ist anzunehmen, dass das Holz eventuell von Würmern befallen ist oder andere Macken hat. Daher solltest du das Rohmaterial erst einmal mit dem High pressure cleaner reinigen und in warmer Umgebung trocknen lassen. Prüfe auch genau, ob sich vielleicht noch irgendwo im Holz Nägel und Schrauben hide
Only when everything fits is it worth going to the carpenter.
2) Holzbohlen für den Nachttisch bearbeiten
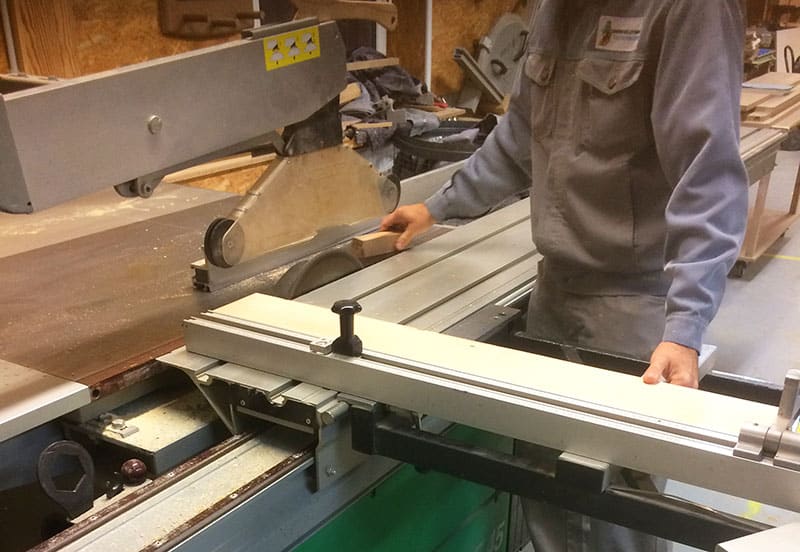
Damit der Tisch später nicht wackelt, sollte die Oberfläche gerade sein – an den Rändern kann aber ruhig eine natürliche, schräge Baumkante stehen bleiben. Das macht den Nachttisch einzigartig. Um das Holz dementsprechend zu bearbeiten, lässt du es am Besten beim Tischler besäumen, hobeln und wie gewünscht zuschneiden.
Ich habe einen befreundeten Tischler, zu dem ich beispielsweise auch die Hölzer für meinen homemade coffee table gebracht habe. Aber selbst wenn du keinen Tischler kennst – wird dich das natürlich nicht aufhalten.
Damit später kein merkwürdiger Anblick entsteht, sollten beide DIY Nachttische auch eine (zumindest fast) identische Oberfläche bekommen.
3) Sand wood smooth
Sobald du die Zuschnitte für die beiden Oberflächen deines Nachttisches hast, kannst du sie schleifen. Fange mit einem groben Sandpaper an (80er) und nutze für den Feinschliff dann 120er Schleifpapier.
Puste den Staub vom Holz und wische die Holzoberflächen noch einmal mit einem leicht angefeuchteten Lappen ab. Nachdem ein paar Minuten vergangen sind, kannst du zum nächsten Schritt übergehen, den du hiermit vorbereitet hast.
4) Holzbohlen mit Hartwachsöl anstreichen

Wer sich einen Nachttisch selber bauen will, kann sich natürlich auch selbst überlegen, welche Farbe die Fläche nachher haben soll. Ich bin ein großer Holz-Fan und möchte gerne die natürliche Optik bewahren. Auch wenn der Nachttisch natürlich in der Wohnung bleibt, sollte dennoch eine Schutzschicht aufgetragen werden, die außerdem für einen coolen Glanz sorgt.
Deshalb habe ich mir eine Malerrolle geschnappt und beide Hölzer mit einem transparenten Hartwachsöl angestrichen. Das Öl bekommst du in jedem Baumarkt – alternativ you can get the hard wax oil here*.
Nach etwa 12 Stunden sollte die Oberfläche deines selbst gebauten Nachttisches dann schon vollständig trocken sein.
5) Have metal skids made by professional
Leider bin ich selbst kein Metall-Experte. Damit der DIY Nachttisch später nicht wackelt, habe ich einen entsprechenden Anbieter darum gebeten, die Kufen für die Nachttische nach Wunschmaß anzufertigen.
Bei meiner Suche habe ich viele Anbieter gefunden, die knapp 400€ für die Arbeit und das Material haben wollten. Zum Glück bin ich dann doch auf jemanden gestoßen, der mir die zwei Kufen für 70€ inklusive Versand in den gewünschten Maßen hergestellt hat. Ich habe sie dann nur noch abgeschliffen und mit Klarlack besprüht.
Just write me an email to metal skids[at]careelite.com and I'll be happy to give you his contact information.
6) Oberfläche & Metallkufen verschrauben
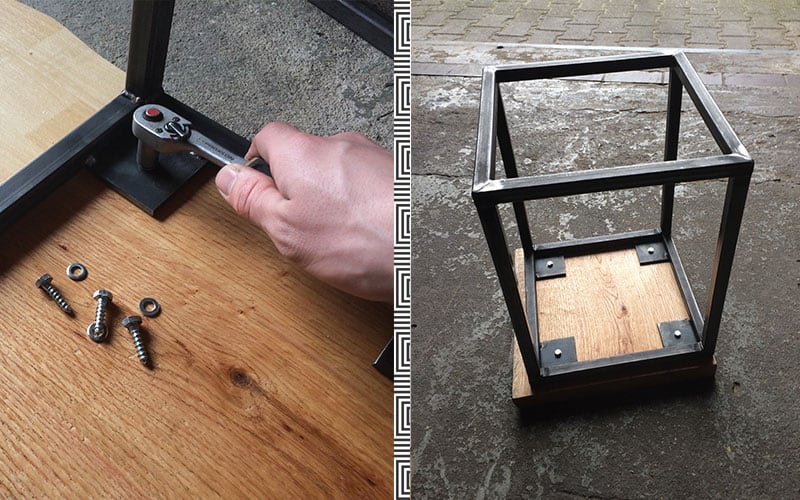
Die Metallkufen sind da und harmonieren perfekt mit den fertigen Oberfläche unserer DIY Nachttische. Damit Kufen und Tischplatten zukünftig auch fest zueinander halten, müssen sie noch miteinander verschraubt werden. Dafür habe ich eine entsprechende Screws and washers besorgt. Es ist wichtig vorzubohren, damit die Schrauben beim Festziehen nicht abbrechen. Achte dabei darauf, dass du nicht aus Versehen durch das Holz bohrst, sonst sieht man das Loch schlussendlich oben auf der Oberfläche des selbst gebauten Nachttisches.
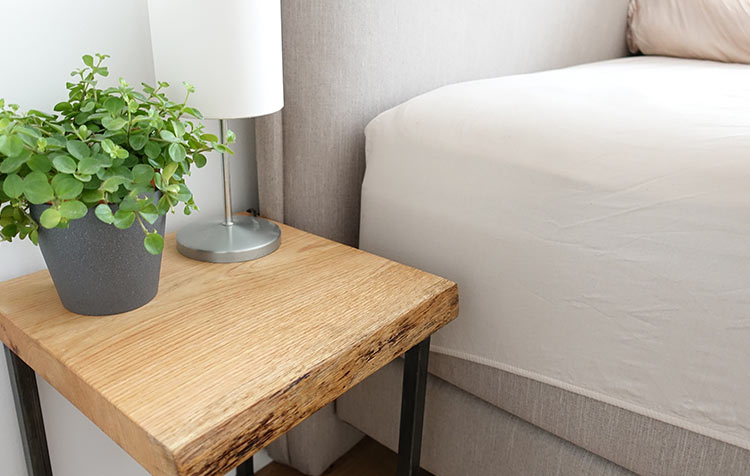
DIY nightstand decorate and ready!
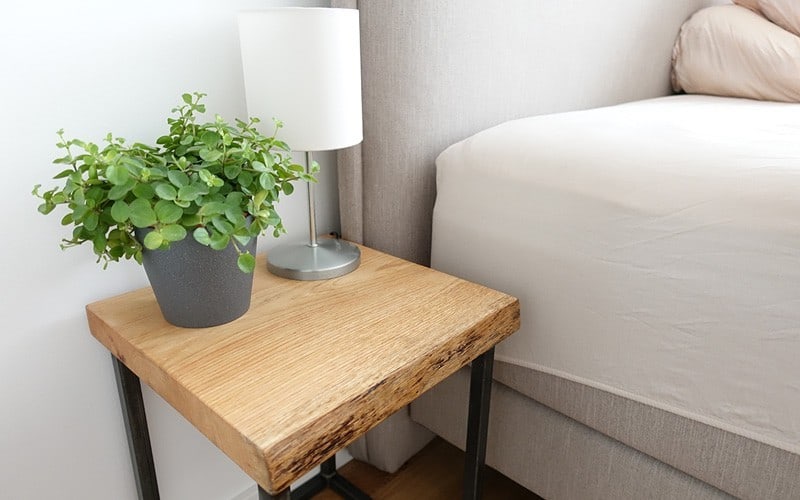
Nun sind die selbst gebauten Nachttische endlich fertig und bereit für Ihren Einsatz am Bett. Ein bisschen Deko und natürlich eine passende Nachttisch-Lampe darauf und fertig ist der DIY Nachttisch aus alten Holzbohlen und stabilem Metall – im Industrie-Look! Wie findest du den Tisch?
Auch wenn das jetzt natürlich schwer zu sehen ist, habe ich unter dem Metall noch Schaumstoff-Aufkleber angebracht, damit der Boden beim Verschieben des Nachttisches nicht zerkratzt. Das wollte ich dir nicht vorenthalten.
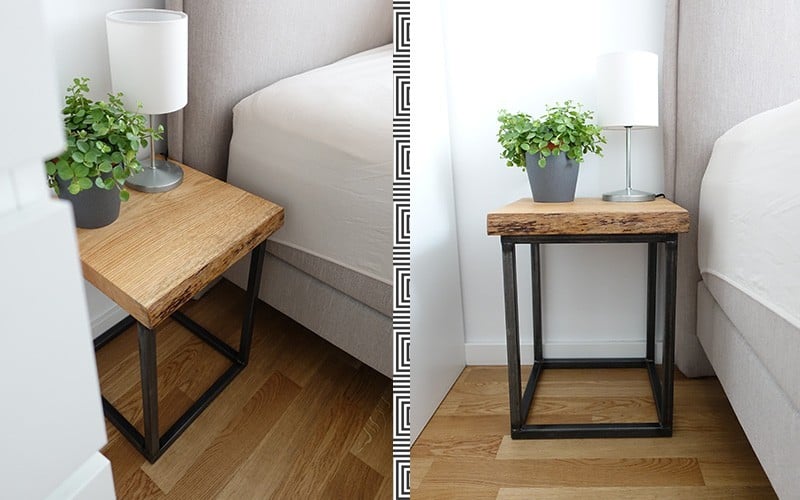
Es muss also nicht immer das große schwedische Möbelhaus oder eines der vielen anderen riesigen Möbelhäuser sein, um die Wohnung schön einzurichten. Stattdessen spart man noch richtig Geld und erweitert seinen persönlichen Horizont bzgl. der handwerklichen Begabung. Ganz im Sinne des Zero Waste Lebensstils haben wir im Übrigen auch noch alten, eingestaubten Eichenbohlen ein zweites Leben als Nachttisch geschenkt. Das ist übrigens auch ganz im Sinne des plastic-free lifestyle – denn wer schon einmal Möbel bestellt hat, weiß wie viel Plastikmüll dabei anfällt.
Do you have any questions or suggestions about building your own nightstand? Then leave me a comment below this article.
Best regards,

PS.: Da ich diesen Nachttisch im Rahmen unseres Umzugs selber gebaut habe, ist es natürlich nicht nur bei diesem einen Möbelstück geblieben. Im Artikel Build desk yourself kannst du zum Beispiel sehen, wie ich aus dem Material für den Nachttisch auch noch meinen neuen Arbeitsplatz gebaut habe.


Hello Christoph,
May I know where you got the great feet of the nightstand?
Thank you in advance.
Greeting Tobias
Hi Tobi, everything is in the text. Just write a mail there 🙂 Thanks for your feedback!
Best regards
Christoph
Hi Christoph,
What is the dimension of the square tubes? 20mm or more?
Thanks and greetings
Dirk
Hey Dirk!
2×2 cm
Best regards
Christoph