
You want to build a DIY dining table yourself from old wooden planks? Then this article from the DIY Furniture Blog help with this. I have also built my own dining table - in rustic industrial style. Now I'd like to show you exactly how I went about it and how you too can build your own dining table from planks. Good luck!
Here is another short Table of contents for you:
Plan for's build dining table yourself
First of all, it is important to have a clear picture of the future dining table in mind and to put this picture at least roughly on paper. This makes the construction of the dining table much easier, because you know the exact goal and do not have to constantly make adjustments. But before you make the first handshake on your table, you should be clear what kind of dining table you want to build yourself. By answering the following questions in advance, you'll be on the safe side:
In what style build the dining table yourself?
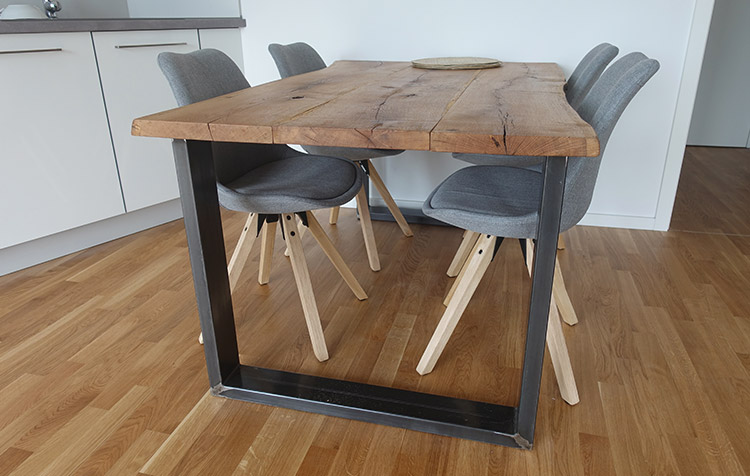
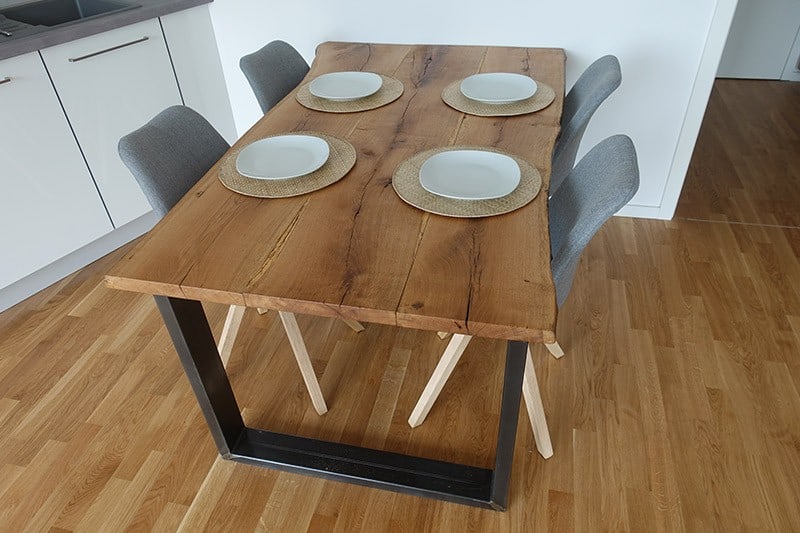
For example, would you like a simple, straight-lined dining table or would you prefer a table in the minimalist style with a touch Industrial charm? As you can see in the pictures little by little, I decided for the latter. Personally, I find industrial design just really cool - especially in combination with wall posters of skylines of big cities (you can find them e.g. at https://myloview.de/poster/nach-kategorie/stadte/) and a concrete wall in the room just looks strong.
So it should be a DIY dining table made of wooden planks and metal - just two different materials. Due to the old, reclaimed oak planks and the massive table runners, the dining table is simple, but still rustic.
The question of style is therefore ultimately also a question of material. It was also important to me that the edges of the table, where you eat later, are not trimmed (straightened), but that the natural tree edge is preserved. This gives each table its truly unique style.
Where should the dining table be placed later?
If you want to build a dining table yourself, you should be aware of the later Location pretty much be clear. Because especially old wooden planks have a little blemish here and there. For example, if you already know that a plank side with a quirk is anyway under the dining table or on the edge of the dining table, which will not be visible later, you can rather be satisfied with it than if the material defects are in a visible place.
In addition, the future space of the DIY dining table may not be rectangular, but may have a slope. Nevertheless, in order to make the table run parallel to other furnishings or walls, it may well make sense to give one side of the table the corresponding angle of the slope as well.
How big do you want the DIY dining table to be?
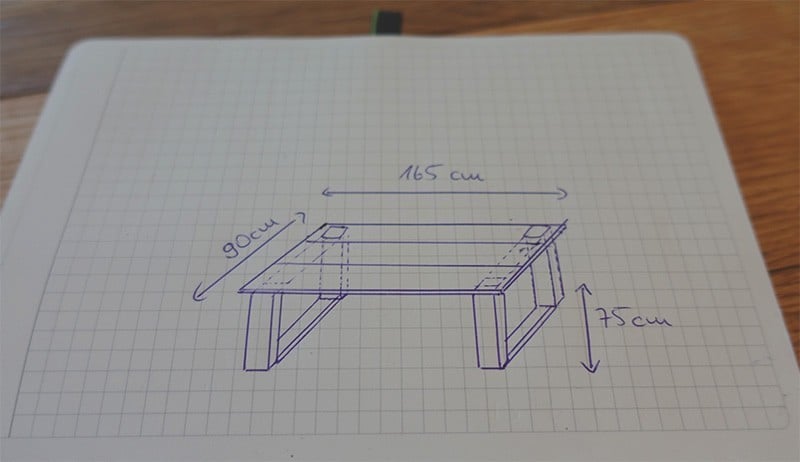
You should be pretty clear in advance how your homemade dining table should look later. I had determined in advance that the DIY dining table about 165 cm long, 90 cm wide or deep and 75 cm high should be. Ordinary dining tables are not quite so wide, but for a massive effect, I opted for a slightly wider table. Not least because the wooden planks were sufficiently available.
So before you start planing, sanding and painting, you should really first be clear about what dimensions the DIY dining table should ultimately have.
DIY build your own dining table
The idea of the dining table is in place - now we get down to the nitty-gritty. We now know what material the dining table should be made of, what approximate size it should have and in what style it should be built. In the following, I would like to show you step by step how I proceeded to build my dining table myself.
1) Get wooden planks for the dining table.
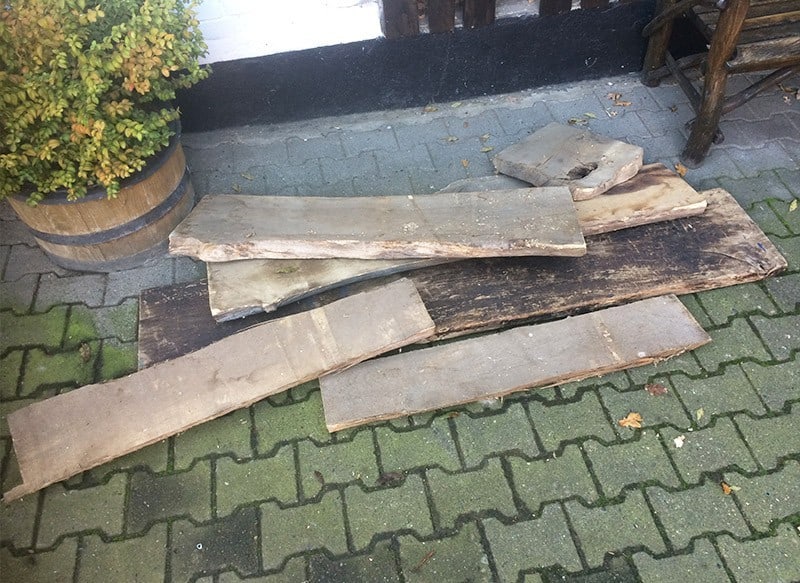
Finding the right wooden planks for the homemade dining table is actually easier in the village than in the city. Because the demand for high-quality Oak planks is now significantly higher in urban areas. In the village, on the other hand, there are many farmers who still have old wooden planks in the attic or in their barn. I do not want to say that the planks are to be found there like sand on the sea, but.... say the planks are to be found there like Plastic waste in the environment.
So, if you are looking for cheap but high quality wooden planks and Save money wants, should start in the village. When choosing the right planks, it is important to make sure that the wood is not yet eaten by woodworms and is still relatively straight. By planing, you can later smooth out a few bumps. The planks should of course correspond to the desired length for the later dining table - to be on the safe side, you should add 30 cm if you decide to use old wooden planks. Of course, it's all a bit easier at the hardware store.
2) Clean, plane, trim and sand planks.
You've got the wood for your homemade dining table, now all you have to do is finish it. Here's how I went about it:
First, I made the wooden planks for the DIY dining table with the High pressure cleaner cleaned. When planks lie on a farm for more than 30 years, then quite a bit of dirt can accumulate on the wood. After cleaning, I could then see if there were still Nails or screws are in the wood. A few nails were actually still in the wood, which I then removed with the pliers. This is very important before the next step is to go to the carpenter.
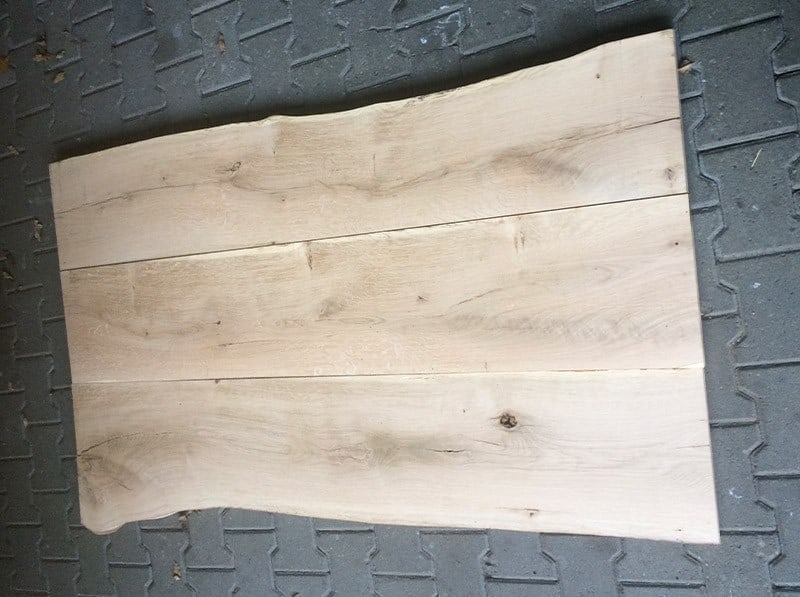
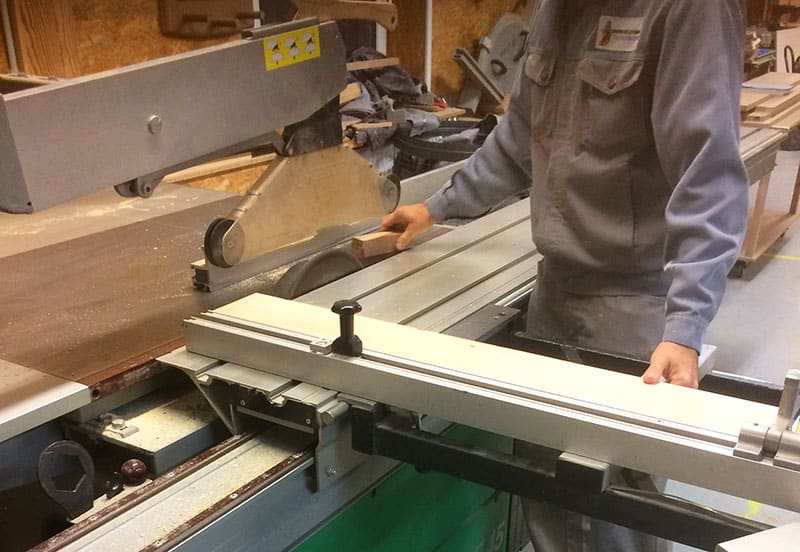
My carpenter friend has the wooden planks for the DIY dining table then smoothly planed and finally edged - except on two sides where I wanted to keep the natural tree edge. All the woods were also cut to the Equal length Shortened.
The carpenter's work was done. Afterwards, the wooden planks for the DIY dining table looked like the picture above - smooth, clean and matched.
I then firstly used an 80 and then finally again a fine 180 to cut the wood. Sandpaper Edited.
Tip: Sand only the surface and the sides at the edge. The inside of the wood and the underside should not be sanded or only roughly sanded so that no unevenness occurs in your self-built dining table. Also make sure that the annual rings of the respective planks also all point in the same direction - because then the wood does not work in different directions over time and the surface remains even.
Things like a multi-sander, by the way, you can also wonderfully borrow. But I actually sanded everything by hand to keep the final costs as low as possible. That also sounds somehow cooler afterwards when you sit at the new dining table with friends for the first time and tell them about it, doesn't it 😉 .
3) Order dining table metal runners in parallel.
So the foundation for the surface of the DIY dining table was laid. But what was actually with the feet of the table? I already commissioned them while I was working on the wooden planks. That saves a lot of time. The Internet is teeming with suppliers of metal runners for DIY furniture - but the prices vary greatly.
Some take 400€ for two dimensionally accurate skids - fortunately I found someone who makes me two skids for 100€ including shipping in the desired dimensions. If you are also interested in the contact, then just write me a mail to metal skids[at]careelite.com and I will gladly pass on the contact to you.
4) Screw together dining table wooden planks
This step is optional, of course, but I really recommend it to anyone who wants to build their own dining table. As already described, works wood over time - that is, it bends. Either it already has or it will. Bumps on the surface of your wood plank dining table are bound to happen.
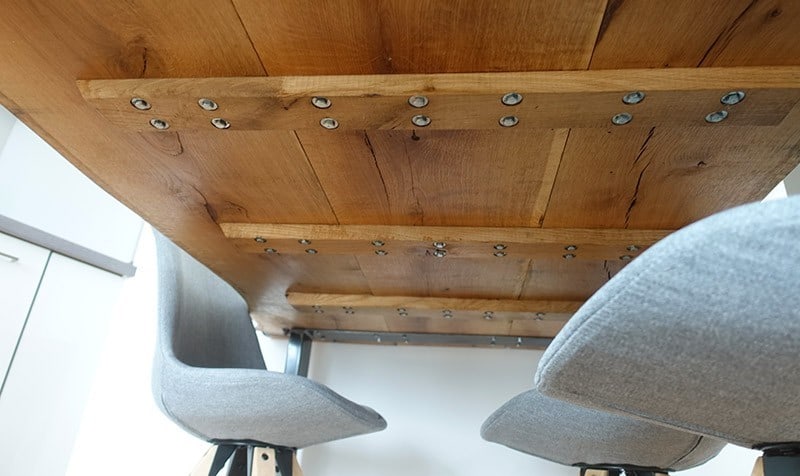
That's why I went to the carpenter and got three more Oak crossbars made, which were screwed crosswise under the three wooden planks to hold the surface together. In each case at the transition to the next wooden plank I tightened screws, as shown in the picture, so that the table is later nice and level and holds together solid.
Tip: You should first drill small indentations in the crossbar at the points with screws and place a metal washer under the screw. This is how you stabilize your self-made dining table made of wooden planks.
5) Paint the surface of the DIY dining table.
After I sanded the surface well and finally also freed it from dust, it could then finally be painted. To preserve the natural character of the wood, I painted the wooden planks with a paint roller, a brush and a transparent Hard wax oil It protects the wood and gives the DIY dining table a slight glossy effect. After about 12 hours, the oil is dry and the surface already shines in its final appearance.
You can get the transparent hard wax oil in every hardware store - alternatively you can get the hard wax oil here*.
6) Process metal runners and screw them with surface.
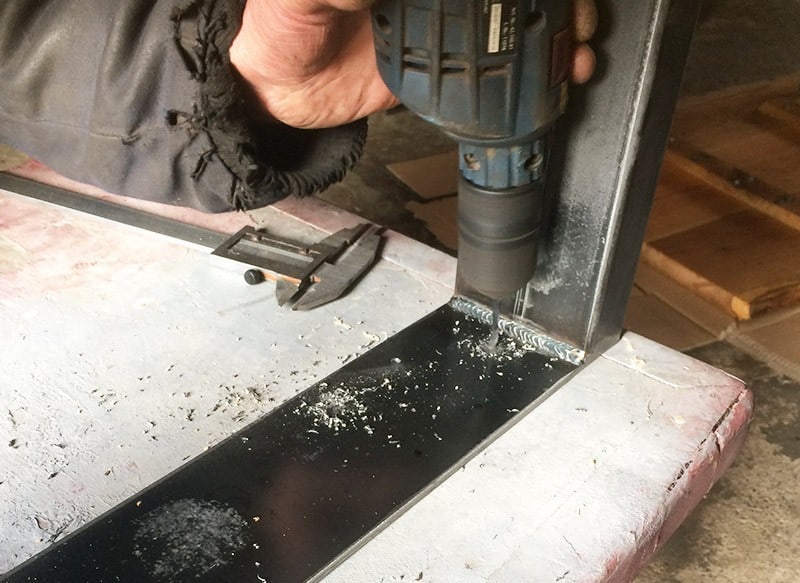
This is the final step if you want to build yourself a DIY dining table. In the meantime, the metal runners should have arrived. In my case, I placed them on the underside of the tabletop the way they would be screwed on later. At the appropriate points, I then made holes in the metal to hold the Screwing wooden planks to the metals. Then I just sanded the metal briefly and gave the table legs a slight gloss effect with some clear lacquer. But if the tables are really only in the apartment, the legs basically but also do not need to be sprayed.
The cool thing about joining metal and wood: When the wooden planks are pulled to the metal, even out the last irregularities. If the dining table is still not completely smooth, you can loosen a few more screws and put thin plates or cardboard between them. This can be a bit of a fiddly job, but it's worth it in the end.
The corresponding By the way, you can find screws here*. (to be selected depending on the thickness of the plank).
Sit at the dining table and enjoy
Now it's done and you can sit down at your finished and self-made dining table according to all your personal wishes. With this DIY dining table we have with the wooden planks old material in the sense of the Zero Waste Lifestyle reused and supported a local service provider from Germany with the metal skids. No mass-produced goods from the furniture store - no unnecessary packaging waste. Instead, a real one-of-a-kind with lots of industrial charm for ultimately small money. And you don't even have to be a carpenter to do it. All you need is a good plan and a desire to make things yourself.
How do you like the self-made dining table? Do you have any questions, tips or suggestions? Then I look forward to your comment.
Best regards,

PS.: I have not only built the dining table itself and the instructions here in the Do It Yourself Blog published. At the same time I have also made from the same material a Coffee table and a Desk built by yourself. Get you in the respective articles with pleasure still a little inspiration for your DIY furniture.


Moin Moin,
I'm excited about your table and happen to be planning the exact same one, with the same dimensions and everything. Now I've finally seen it 🙂 .
My problem though is getting the oak planks, you don't happen to have any handy that you want to get rid of 😀.
Beautiful work!
Greeting Yannick
Hello!
Thanks for your feedback, glad to hear it 🙂 .
Where do you live? If you come from the district of Uelzen (Lüneburger Heide), I can certainly help you. Otherwise look at eBay classifieds in your area, you will almost always find something.
Many greetings
Christoph
Hello 🙂
I find your contribution super! However, I also have the problem to get me suitable wooden planks. How expensive would they be at your "acquaintance"`?
Love greetings
Shari
Hi Shari! Thanks for your feedback! I got them for a few euros. Of course, you always need a little luck. But there are a lot of them lying around on old farms. Just ask around a bit or look in classified ads 🙂
Good luck with the implementation,
Christoph
Great if you are able to make custom furniture. Unfortunately, I lack material, tools and skills. But I think it's wonderful that there are people who share their experiences.
Hi Emma, thanks for your feedback. I don't quite believe you when you link a carpentry shop here as your website 😉 But I'll leave it at that. The post tells you exactly where to get the materials - skills can be improved 🙂 .
Many greetings
Christoph
Where to put old wooden planks? Now I can easily answer the grandpa's question, thank you! He can make the similar one himself for our garden house. The living room is already decorated with a dining table made of oak, which we had built last year. Each of the relatives can now easily find their place. Thank you for your creativity!
Hi Helge! I'm glad, thanks for your feedback! 😉
Many greetings
Christoph
Comments are closed.