
You want to build your own DIY desk? Am best as cheaply as possible and as an upcycling project from old wooden planks? Then you are absolutely right here! Nothing is better than taking a big step away from the mainstream to unique furniture that will fill you with happiness and pride.
Now, in this article, I'm going to introduce you to a compact tutorial that I used to make myself for just under 200€ built a wonderful DIY desk. You'll learn what to consider when planning a desk. You'll also learn how to build it step by step. Let's go!
In advance, here is a brief overview for you:
Tip: In my Do It Yourself Furniture Blog you will learn many more DIY projects for the home. Look for example also still the Instructions for the homemade dining table an.
Planning: how to plan a DIY desk?
Think first, then do - a sensible basic rule for many areas of life, which also helps when building your own desk. Because before you make the first move, you should have a pretty clear picture of the desk you've built yourself in front of your eyes and, ideally, on paper. Answering the following questions will help!
1. what style should be the self-made desk?
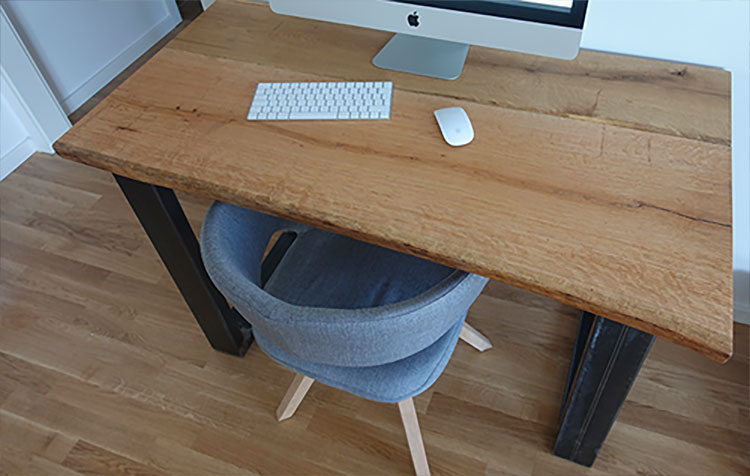
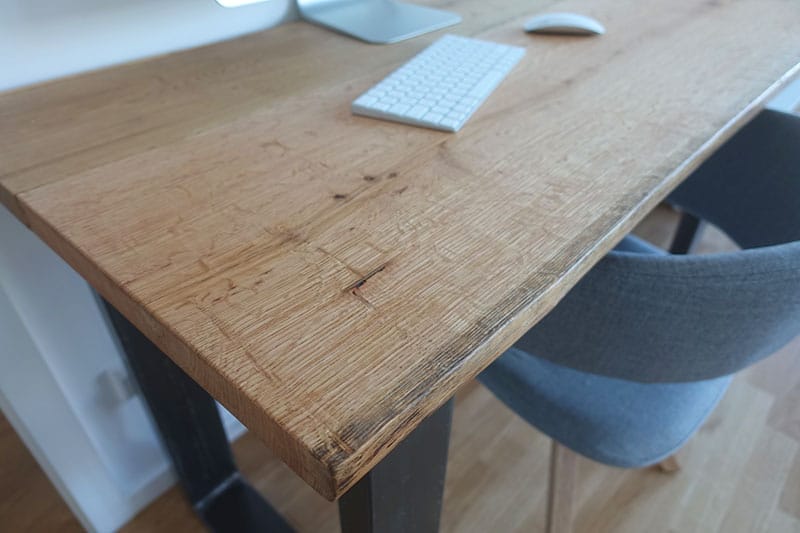
Of course, this question must be answered clearly in advance! Because possibly the desk visually otherwise stylistically does not fit at all in the room in which it is to carry later once mouse, screen and keyboard. When I wanted to build my desk myself, I opted for a Mix from Minimalism and Industrial Design decided. Rustic oak but kept quite simple, so to speak.
"Creativity is the fun you can sell as work."
Andy Warhol
Simply because it fit very well with the rest of the apartment. I like it when furniture doesn't look so straightforward like a DIY store. That's why I specifically looked for wooden planks that still have their natural tree edge.
2. what material is used for DIY desk?
What do you need to build a desk? The desired material is the practical answer to the question of the style of the desk. A combination of Metal and wood - was my answer. Oak wood for the surface and industrial metal for the table legs. Completely in the spirit of the Zero Waste Lifestyle I wanted to save a few old oak planks for this and give them a second life as a desk surface.
Of course, the question of material is always a question of availability and your own budget. I didn't want to spend vast sums on a designer desk, but rather spend only about 200€to still end up with a desk that others might spend a lot more money on. For example, because it simply looks unique.
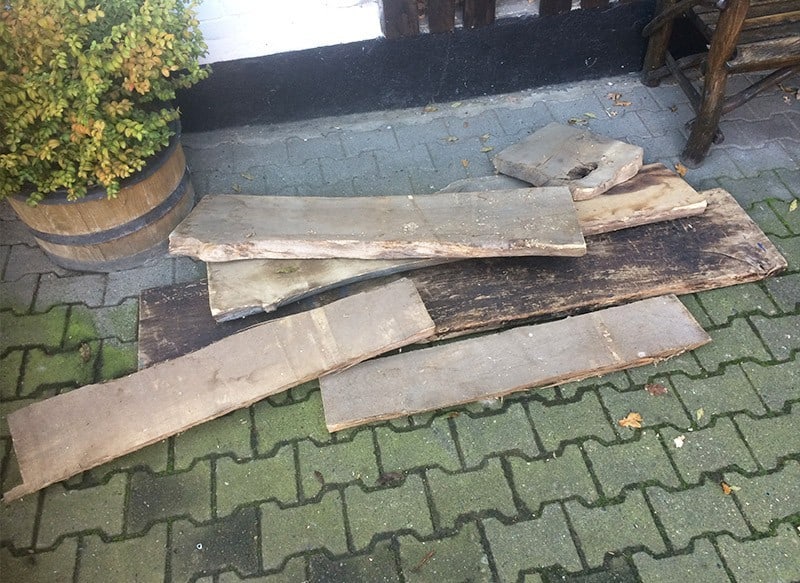
In urban areas, wooden planks (especially oak planks) are usually hard to come by or only for a lot of money. In my home village, they were fortunately lying around on the old farm of a family friend who had no more use for them. In the end the Wooden planks already over 30 years old and free of charge for me.
Notice: It's getting harder and harder to get cheap oak planks. You may have to spend a thaler or two more, but it's worth it in the end!
3. how big should the self-made desk be?
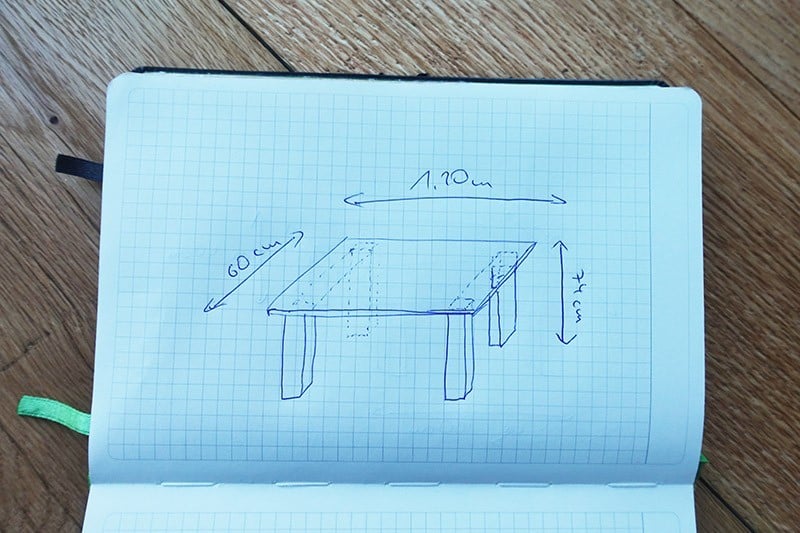
I built the desk for our new apartment - I basically did well with the industrial style. But because of the relatively short wall it was to stand against, it couldn't be too long. Therefore you should also consider carefully in advancehow large the DIY desk should be - both in length, width and, of course, height.
For the latter measurement, you should just try it out a bit on other tables. A common table height, for example, is around the 74 cm. I have also planned it that way. For this a length of 120 cm and a width of about 60 cm.
Construction: How can I build a desk myself?
So the idea was there! Now it was a matter of finding the right material, processing it and finally connecting it together so that it becomes a usable DIY desk.
The planks for the desk were lying on the farm at a friend of my parents for over 30 years. Some were just a little bent and a little oily. But that's nothing that couldn't be solved. Otherwise, the planks were really great.
What do you need to build a desk?
For the construction I basically needed the following things, but I already had most of them:
- Drilling machine (my recommendation you will find here*)
- Screws and shims (is available here as required*)
- Painter set with brush and roller (you get here*)
- Organic hard wax oil (you can find here*)
- Oak planks
- Metal skids
Here I would like to show you how I proceeded from the beginning until the first time my computer settled on the self-built desk in my apartment.
1. clean and examine wooden planks
Before I could plane the wooden planks, I first had to clean with the high pressure cleaner. Around the planks Quick to dryI simply put them in a warm room for a few hours. After cleaning, it is then wonderful to see if there are still any nails, screws or other sperenzien hiding in the beautiful oak planks.
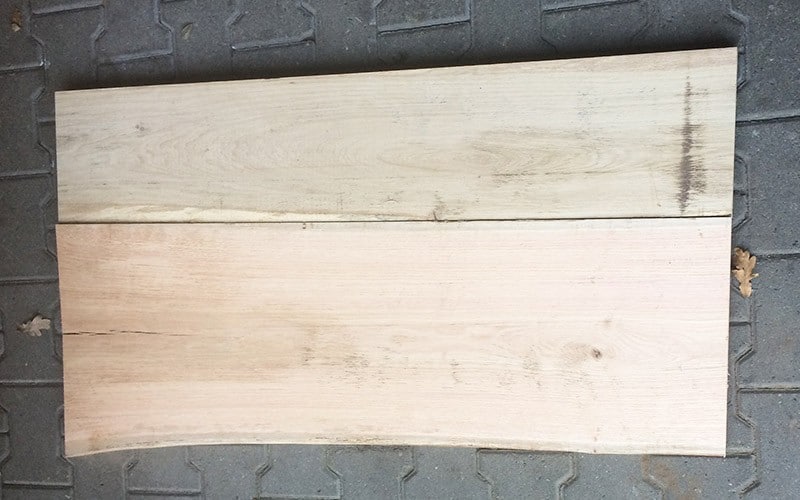
In my case everything fit and the wood was ready to be edged, planed and To be tailored. By the way, for the desk I used only two wooden planks, because one of them was already wide enough to reach the planned 60 cm depth of the DIY desk.
For the large plank, I decided to use the natural tree edge, which the later puts the front of the desk, not to be trimmed. So really every table becomes absolutely unique.
2. trimming, planing and cutting to size
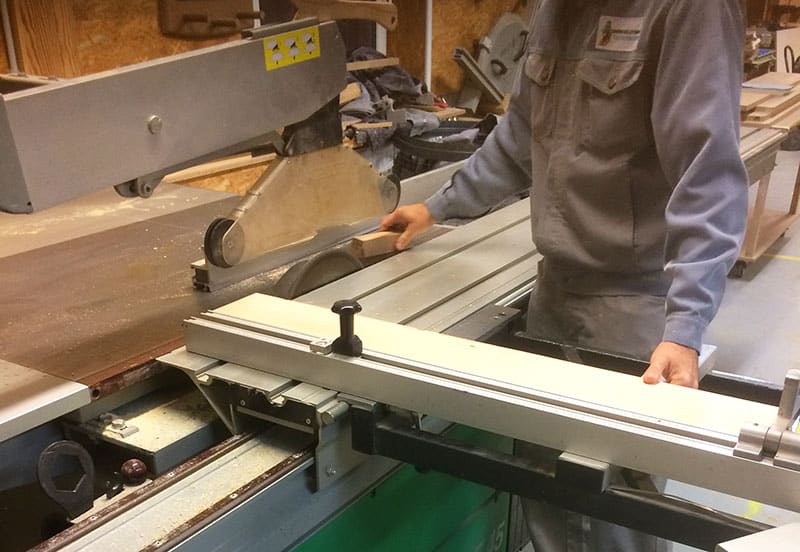
The next step of the DIY desk was to bring the wood to the desired dimensions. Any unevenness was also removed. Even though you can never get 30 year old oak planks 100 percent straight, they formed after the Trimming, planing and cutting to size Finally, a fairly straight surface.
However, you can see how even and level the wooden planks actually are especially when they lie next to each other on a smooth, flat surface.
An important tip if you're going to a carpenter or joiner: Before you go to the carpenter, be clear about which plank will be where later and where you want to have a tree edge and where not.
3. sanding wood with different thicknesses
Now the most important step is already done, the wood is evenly trimmed. In plain language, you know where the top and bottom, and back and front.
I simply placed the wood for the desk on a stack of Euro pallets and first manually cut the edges. with an 80 grit sandpaper and rounded off a little at the corners. Make absolutely sure that you sand the later, invisible inner sides only roughly or not at all.
How to create a transition as smooth and inconspicuous as possible between the individual planks. You should also only roughly sand the planks of your homemade desk from below so that the surface does not wobble when it later rests on the metal runners.
4. attach crossbars & screw together
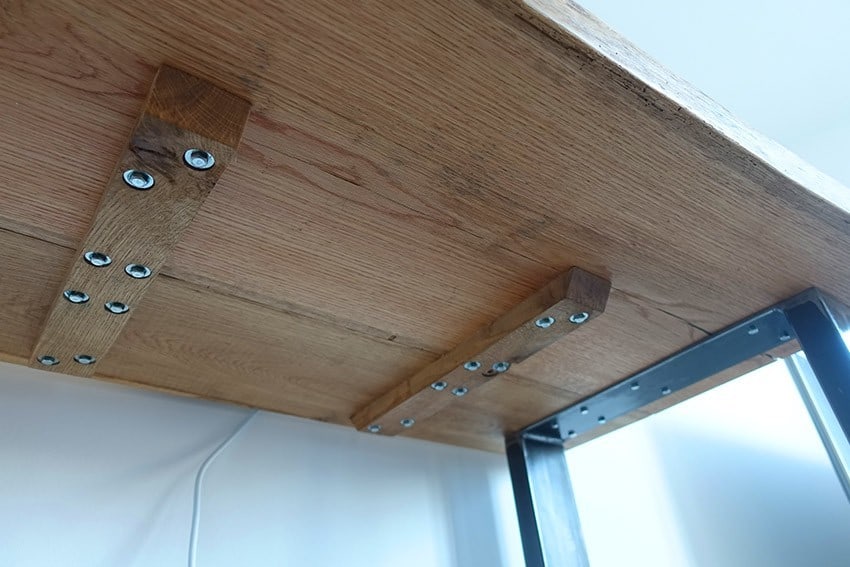
This step may not be necessary, but it is still a useful addition. If you Unevenness on the surface you can compensate for this, for example, with evenly screwed crossbars under the table.
Screw them together near the junction of the planks, so that they are on the surface the same height and there is no longer a heel at the transition.
Now you have the entire surface of your DIY desk in one piece, and you can once again final sanding with fine 180 grit sandpaper.
Tip: The corresponding Screws you get again here* depending on individual needs.
5. paint desk planks with hard wax oil.

If you want to build your own desk, it is essential that you sand the wooden planks before applying the first coat of ecological hard wax oil. clean from superfluous dust. The oil protects the wood and gives the tabletop a slightly shiny look. So grab your roller and brush - and paint the sanded and cleaned wood.
Make sure that not too much hard wax oil on the table and just use it sparingly. Give the planks about 12 hours to dry in a warm room. The appropriate equipment, i.e. a Set with paint roller and brush*, as well as the Hard wax oil you get here*.
6. get and process metal skids
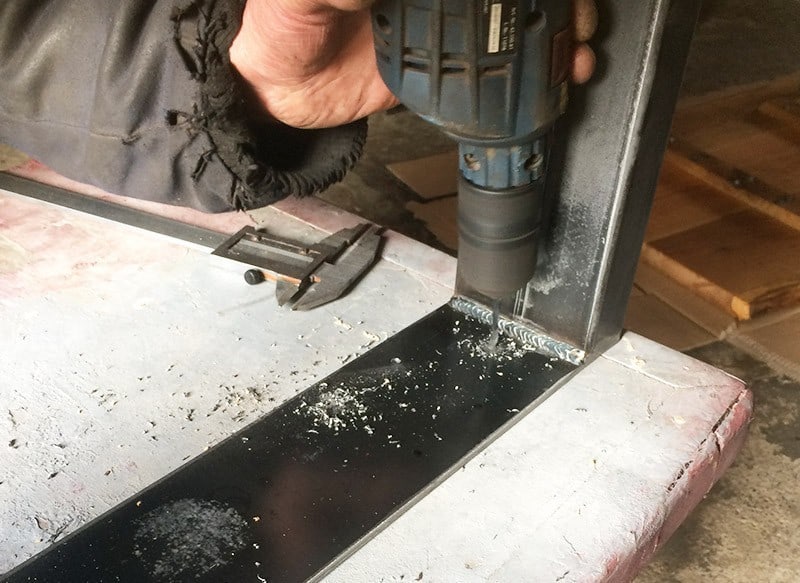
Until now, I only had a table top of my self-built desk. What should it stand on again? Oh yes, on metal runners! The I have parallel to the construction of the table top in suitable and desired dimensions made and sent to me. I came across the supplier on the Internet - he manufactures custom-made metal table legs at a relatively low price. (at that time it was only 100€ per piece)
Tip: If you want to use the same contact, just send me a short mail to metallkufen[at]careelite.de.
The metal runners you should grind pure with a sandpaper and clean it sufficiently. I chose not to spray paint them because I like the table legs to look a little worn. Of course, the decision is up to each person.
However, the runners still need holes to screw the table top firmly onto them. When doing this, you should make sure that you predrill near the transitions of the wooden planks. The reason for this is that existing unevenness at the edge of the surface can still be straightened. In this way, you end up with a really smooth surface that can be wiped clean.
7. screw wooden planks and legs of the table
If you want to build your desk yourself, you should of course screw the tabletop and metal runners together in the last step. Of course, you should adjust the length of the screws according to the thickness of your wooden planks so that they don't stick out on the surface later on 😉.
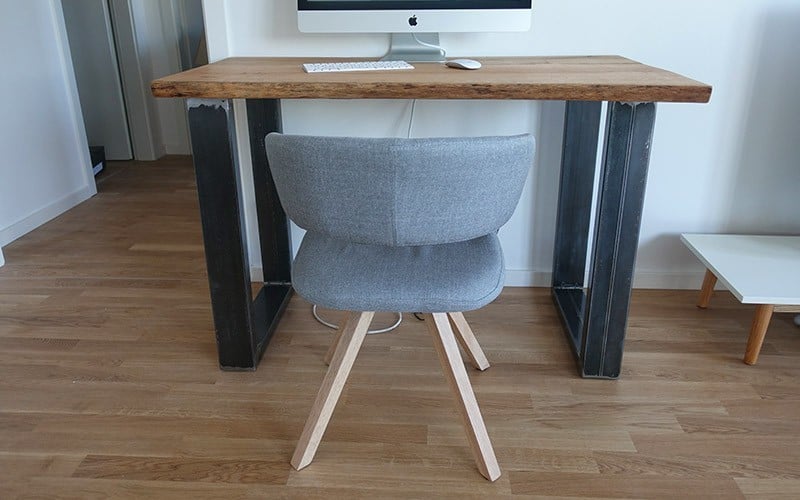
By screwing the table legs to the table top, the individual wooden planks will still pull down a little, so the surface should now be completely straight. If you still have small bumps in itYou can sand it again and coat it with hard wax oil.
Build your own desk and get started!
I hope that this little tutorial will help you to build your own desk. It doesn't have to be an identical copy, but maybe you'll get a little inspiration and motivation for your own DIY project. Personally, I think it's great when the furniture in your home has a little story to tell.
And now have fun building it! Do you have questions, suggestions, tips or your own experiences with building a DIY desk that you would like to share? Then I look forward to your comments.
Stay creative and sustainable,

PS: The desk was created in the course of my move and I immediately used the available material to also build other furniture in the same style. Look now next for example the articles Build coffee table yourself and DIY bedside tables on. Have fun!


Great idea. I will also build and my old I give in the second hand store. A bit of a guilty conscience I have already, because I get rid of something that is still good, but my desk is made of plastic and I just do not want this material more.
Hi Monika! You do not have to have a guilty conscience, because you make sure that someone else can continue to use it 🙂
Have fun with the implementation and best regards,
Christoph
Comments are closed.