You want to build yourself a DIY coffee table from old wooden planks? Then you've come to the right place. Some time ago, I had exactly the same idea and wanted to build my own coffee table with its own little story. Now I would like to show you the DIY coffee table here in the Do It Yourself blog for furniturepresent. In this article, you can find out how I went about it, where I got the wooden planks from and how the coffee table now looks in our home.
Here is another short Table of contents about this DIY article:
The plan for the self-built coffee table
Before you start sawing, screwing and planing your new DIY coffee table, you should first know what the coffee table should look like and, above all, where exactly it should be placed. If the sofa corner in your home is a little smaller, for example, then the coffee table shouldn't be oversized so that the overall look doesn't appear confusing. The following questions popped into my head before I had even completed a single step:
What style should the DIY coffee table?
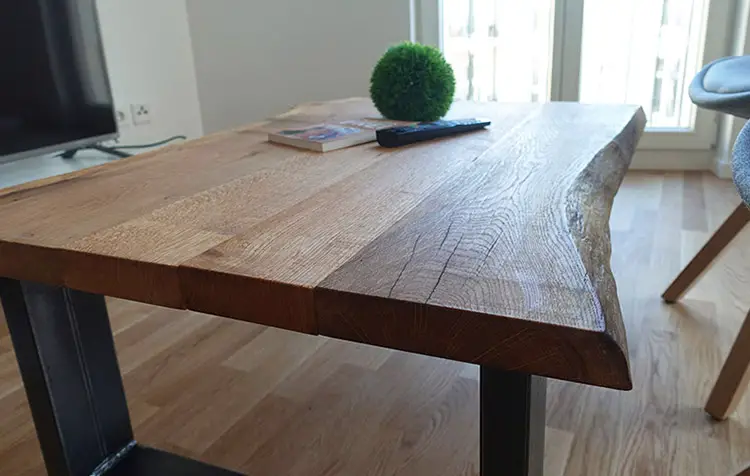
What style would you like to build your own coffee table in? When answering this question, it is important that the table also fits well visually into the future home. For example, should the coffee table be more minimalist or exude a little industrial charm? In the end, I opted for a mixture of both with the old wooden planks and the solid metal legs. As the rest of the apartment is also furnished in an industrial style, the coffee table fits in seamlessly with the rest of the furnishings.
I also wanted the used edges of the table not to be trimmed, but to retain the natural tree edge wherever possible.
Length, width and height of the coffee table?
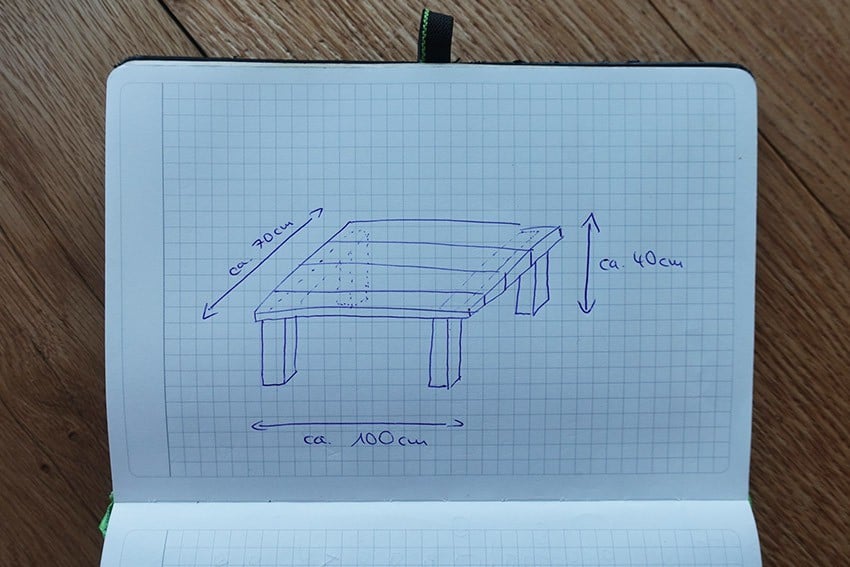
The size of the DIY coffee table should, of course, be determined at the planning stage. The ideal size for the coffee table usually depends on the size of the room and the space available. I wanted to build a coffee table myself that was around 100 cm long, around 70 cm wide and just under 40 cm high. This way, the table fits perfectly in the corner of our sofa. Tip: To ensure that the table doesn't end up being too high, you should also take the thickness of the table top into account - the wooden planks of my coffee table, for example, are just under 4 cm thick.
Material of the self-made coffee table?
As already described, I wanted the coffee table to have a minimalist, industrial style. I only wanted to use two different materials - wood and metal. To do this, I looked for really old but still intact oak planks in our area to breathe new life into them. In the countryside, you can usually get these oak planks very cheaply because they are lying around in every other attic. In the city, these old planks are more in demand for tables and therefore not quite so cheap. But I also live in the city and that's exactly why I asked around in my home village. Finding cheap, sturdy and well-made metal runners for the DIY coffee table turned out to be a real challenge. However, in the end I ended up with a well-known Zero Waste App called eBay classifieds for 100€. If you are interested in the contact, just send me a short e-mail to metallkufen[at]careelite.de.
Building the DIY coffee table from planks
So now it was pretty clear what the table should look like. In the next step, I would like to describe exactly how I went about building this DIY coffee table from wooden planks as quickly, cheaply and, of course, satisfactorily as possible.
Get metal runners for the coffee table
You can find square or rectangular metal runners on the internet for around €300 - €400. That was far too expensive for me. In the end, I found a really good supplier who made the runners exactly as I wanted them. As I already knew the dimensions of my table, he was able to make and send me the metal runners within a week. I only paid €100 gross for two table legs - including shipping. If you also want such inexpensive metal runners for your DIY coffee table, just send me a short email to metallkufen[at]careelite.de 🙂
I briefly sanded the metal runners with a random orbital sander and painted them with a clear transparent lacquer to give the table legs their rough industrial charm.
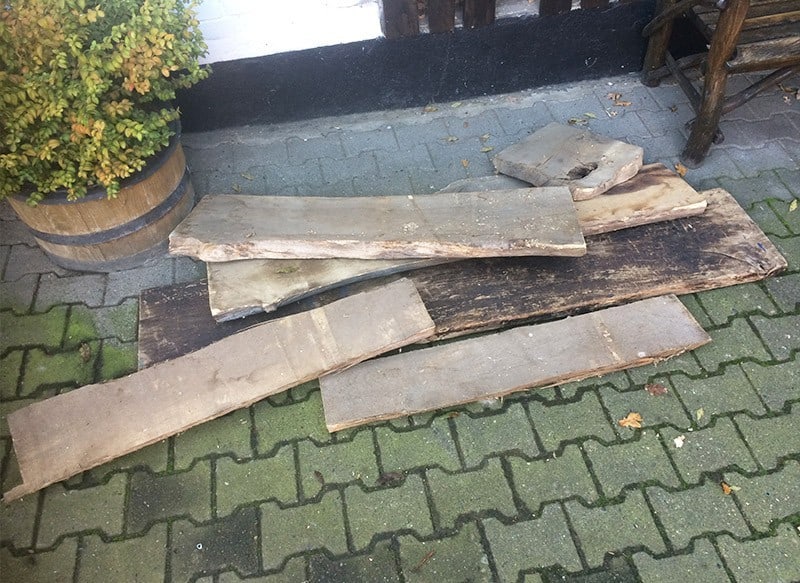
Obtaining and processing wooden planks for coffee table
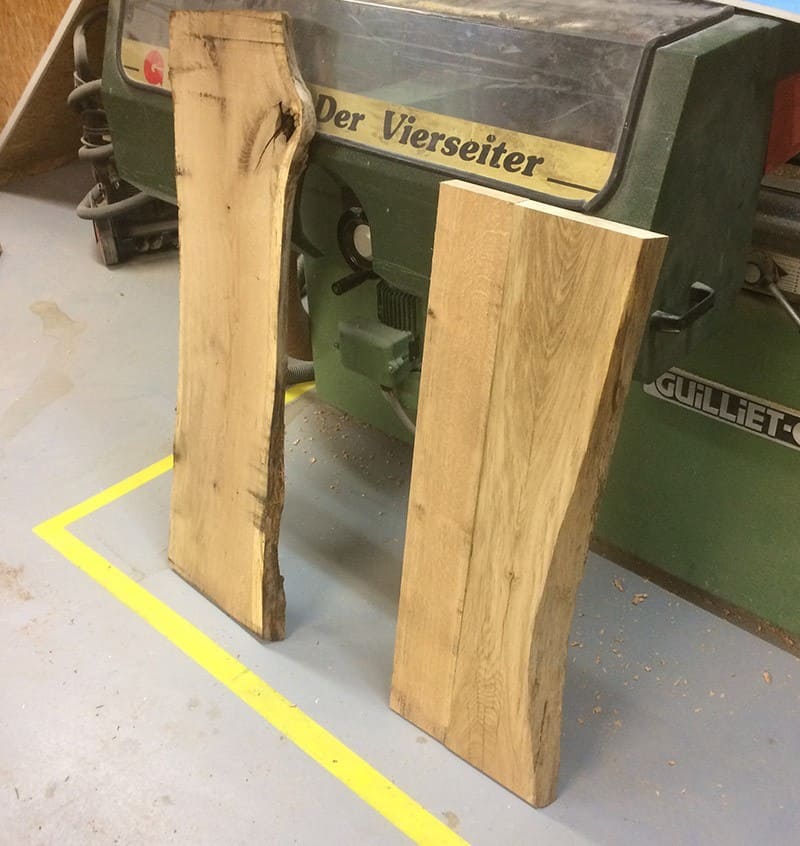
Nothing is more boring than building a coffee table from pre-cut, new wood. A DIY coffee table only gets its own charm with a few rustic, old oak planks. As already described, finding suitable wooden planks is much easier and cheaper in the countryside than in the city. After a few conversations in my home village, I quickly found someone who has had a pile of old oak planks in his yard for 30 years. I bought the planks from him for little money and transported them to my home. As I now had a lot of wood, I built a dining table and a desk myself in addition to the coffee table. After a final materials check, I was finally able to get started and prepare the wood for my tables. I proceeded in the following order:
1) Clean and examine oak wood
As the next step was to take the wood to a carpenter for straightening, I checked it for nails beforehand, removed any superfluous dirt with a high-pressure cleaner and dried it in a warm room. This step shows how beautiful the wood still is, even though it has been lying unused in a corner for 30 years.
2) Planing, trimming and cutting wooden planks to size
After I took my beautiful planks to the carpenter, they were planed evenly on site, superfluous edges (of the connecting pieces) were trimmed and all the planks were cut to the appropriate lengths and widths. Apart from a slight bend in the working wood, there were no further problems with the wood for the DIY coffee table from this point on.
3) Sanding wooden planks
First lay the wooden planks next to each other in the way you want the table to be later. Make sure that the direction of growth of the wood (the annual rings in the cross-section of the wood) always point in the same direction. This gives you the best chance of ensuring that the table top remains even over time. To ensure that the self-made coffee table doesn't have any sharp edges or rough surfaces later on, I sanded it first with 80-grit sandpaper and then later with 180-grit sandpaper. It is important that you only sand the outer sides of the coffee table and the top. To keep the underside nice and straight, you should only sand over it very roughly once at most. You also don't need to sand the sides that will be joined together later. This way, you won't have any unevenness in the beautifully smooth surface afterwards. Optionally, you can now glue the wooden planks of the coffee table together. However, I didn't do this because of the greater effort involved and the longer waiting time. In the end, it works just as well 🙂
4) Coat wooden planks with hard wax oil
To make the wooden planks for your coffee table very easy to clean, the surface should be as smooth as possible and have a kind of protective film. You can coat it with hard wax oil, for example. I opted for transparent oil so that the wood looks as natural as possible. The hard wax oil prevents water from a fallen glass, for example, from soaking directly into the wood and causing any damage. The oil also gives the oak planks a slightly glossy look.
The corresponding You can get hard wax oil here*.
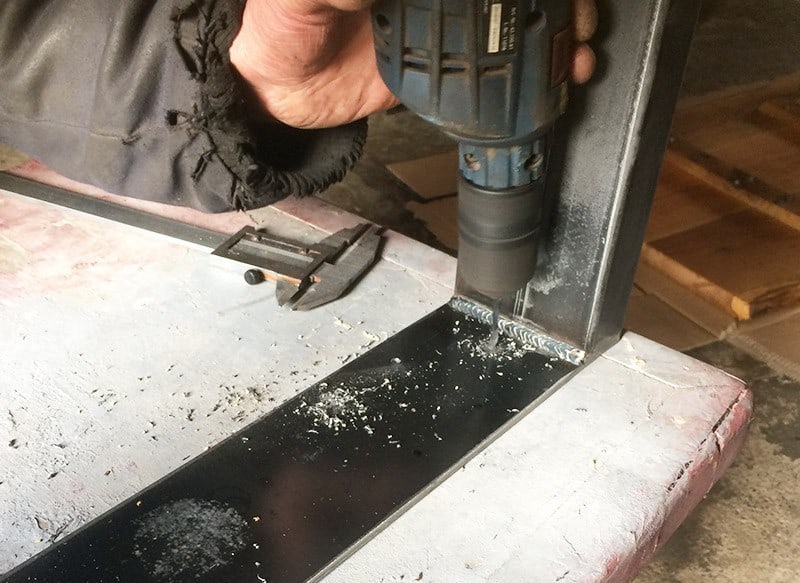
5) Machining metal skids
The wood of the coffee table can now dry. The next step is to machine the metal runners for the table. All in all, the time required to finish them until they are dry is limited. I first briefly sanded off the rust and other deposits on the metal and then wiped the surface clean with a damp cloth. Now the way was clear to spray the clear coat safely onto the metal. I did this with a spray bottle - plastic-free unfortunately this is not possible as far as I know. I wanted to preserve the somewhat rancid "used look" of the metal and therefore opted for a transparent varnish. Of course, it is also possible to spray the table legs with a color. In any case, they dry quite quickly. Either before or after spraying, you can now drill the holes for the screws to connect the wood and metal in the appropriate places in the table legs.
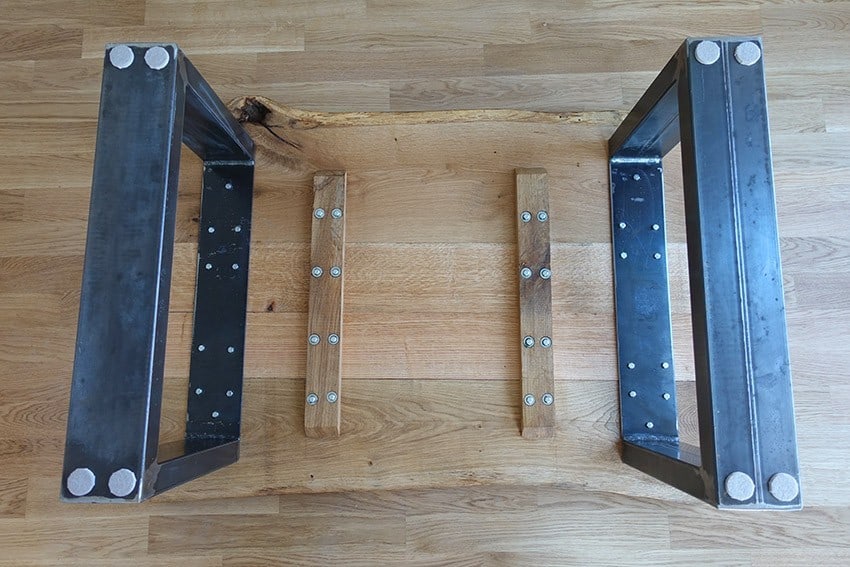
6) Compensate for bending with crossbars
Ideally, the wooden planks are not bent and are all the same thickness. However, as wood is known to work, the planks are usually not completely straight. This cannot always be completely avoided, even when planing. To avoid possible unevenness on the surface of the coffee table in particular, it is worth joining the wooden planks together with 1-2 crossbars under the table. This will smooth out any unevenness on the surface. By placing some cardboard or other thin layers between the cross slats and wooden planks, you can still vary the heights slightly.
The corresponding You can find screws here*.
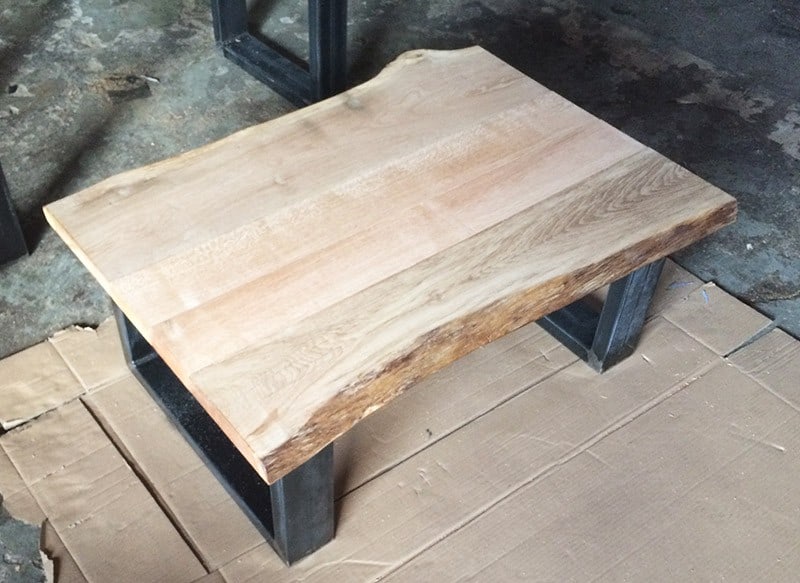
7) Screw wooden planks to the metal skids.
The planks of the DIY coffee table are ready and the holes in the metal are also pre-drilled. If you want to make your coffee table yourself, the next step is to screw the planks to the metal runners. To do this, simply lay the coffee table (optionally: already screwed together) on its back. Then you can place the metal runners in the desired positions and carefully drill through the pre-drilled holes in the metal into the wood. This gives the screws a straight path into the wood. Depending on how much the surface warps, you can also balance it out a little using screws tightened to different strengths. This will give you the smoothest possible surface.
The corresponding You can find screws again here*.
Decorate and enjoy a DIY coffee table
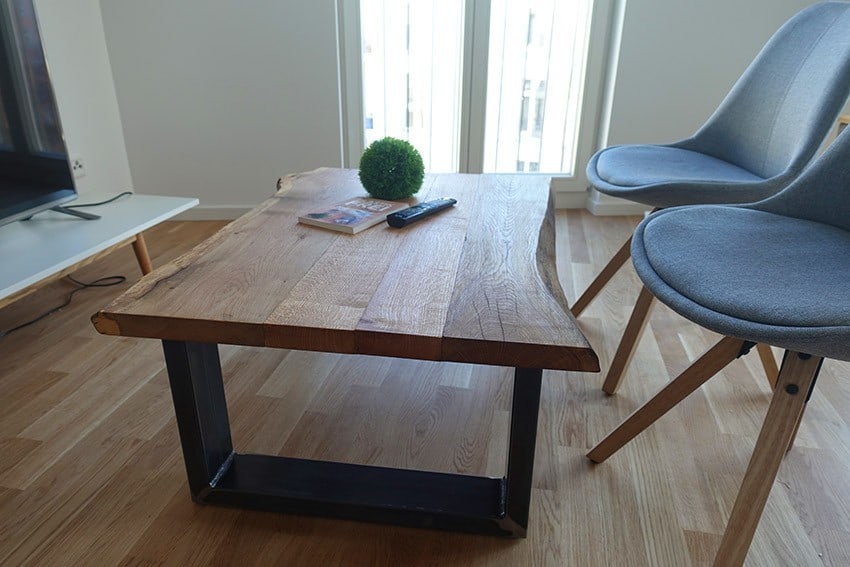
After transporting it to your own home and a quick assembly, it's finally done. The sturdy DIY coffee table made from old oak planks and metal is finished and ready for permanent use. Now it's time to decorate and enjoy as desired. Even though a coffee table like this takes a little more work here and there than you might expect, in the end it was finished quite quickly. What do you think of it? I look forward to any feedback and, of course, any questions about the self-made coffee table made from wooden planks.
Best regards,
![]()
PS.: Feel free to look further in the Do It Yourself Blog - there you can learn, for example, how to make your own coffee table in addition to the DIY. Make toothpaste yourself simply by following your heart.